How to add Google Analytics Code in WordPress Blog?
Hello everyone, Today we are going to understand how we can add Google Analytics Code in WordPress.
Before jumping into the answer of the above-mentioned question i.e “How to add Google Analytics Code in WordPress Blog?” let’s understand What is Google Analytics and its use.
What is Google Analytics?
Google Analytics is the Web Analytics FREE tool offered by Google which is used to analyze the website traffic.

We ar
Google Analytics is the analytics tool which can be used for the analysis of your website traffic. Using it you can know how many users are visiting your website or page daily, monthly, yearly, etc.
You can know:
- How many users are currently on your website
- The browser of the visitor, device of your visitor like mobile or desktop.
- Location of visitors.
- How much time spent by the visitor on your website or blog post.
So these statistics will help you to improve your website traffic. You can know which blog post visited more times and from which location.
Also Read the blog post about increase the traffic for your blog
Lets jump into the question now.
How to add Google Analytics Code in WordPress Blog?
There are two ways to insert Google Analytics code in WordPress blog:
- Edit header.php file and put the Google Analytics code in between < head> and </head> tag.
- Use WordPress Plugin Insert Headers and Footers ( Recommended )
Lets understand both of the above ways of adding Google Analytics Code in WordPress blog.
1. Edit header.php file and put the Google Analytics code in between <head> and </head> tag.
This is not recommended at all.
This is risky one if you are not that much technical. Never edit any of the WP file instead use Plugins.
What is the Risk?
If you are not technical: The Risk is you may put it on wrong place or you may something else which is not expected. Any small mistake will break your website. Hence take a backup of your website code or at least the file which you are editing ( in this case it is header.php )
If you are
When you Change theme your changes will be lost and because of that you will
So lets understand how to add Google Analytics code in your WordPress blog without using Plugin:
Step 1: Get your Google Analytics Code:
1. Login your Google Analytics Account and select the website for which you need the tracking code.
2. Click on Admin in the left taskbar.
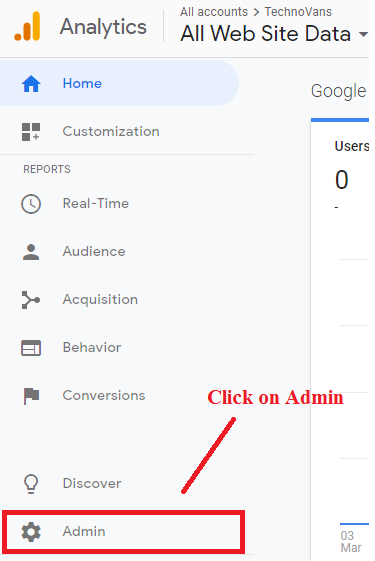
3. After click on Admin menu, you will see three columns as: Account, Property, View
4. Click on Tracking Info in Property Column.
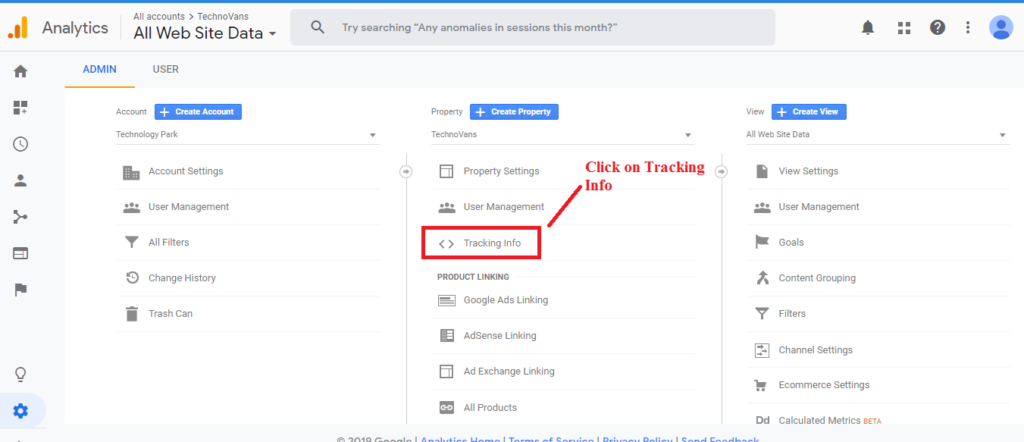
5. After click on Tracking Info you will see sub menus, select first menu i.e. Tracking Code
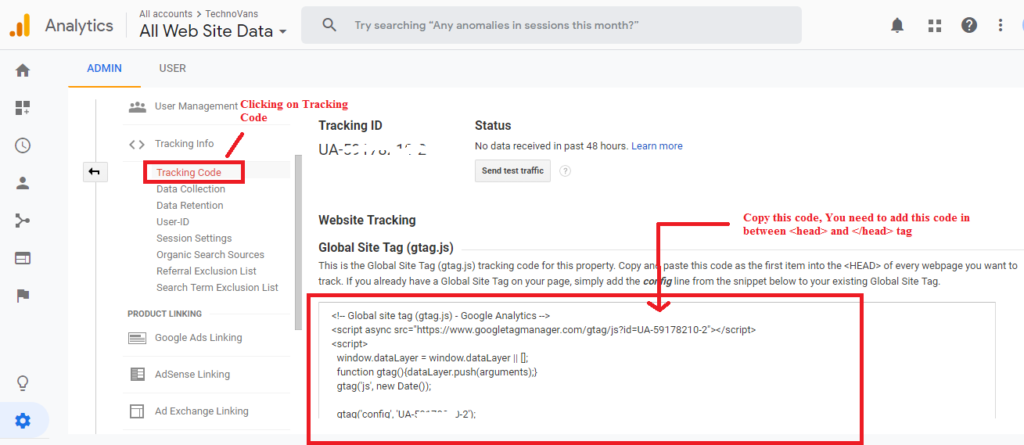
6. After Clicking on Tracking Code you will see the tracking info that your Tracking ID and below that you will see the heading Website Tracking and subheading Global Site Tag (gtag.js). You can see the box in which your Google Analytics code is present.
7. You need to Copy this code and add that code in header.php file of WordPress.
Step 2: Add your code to header.php
Now its time to navigate to your header.php file to put the copied code.
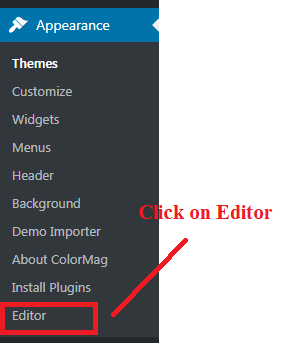
1. On left side of your WordPress dashboard ( after login ) you can see the menu Appearance, click on that menu.
2. After clicking on Appearance you will see sub menus and the last sub menu is Editor. Click on Editor Menu.
3. After clicking on Editor menu, you will see the Popup with heading Heads up!
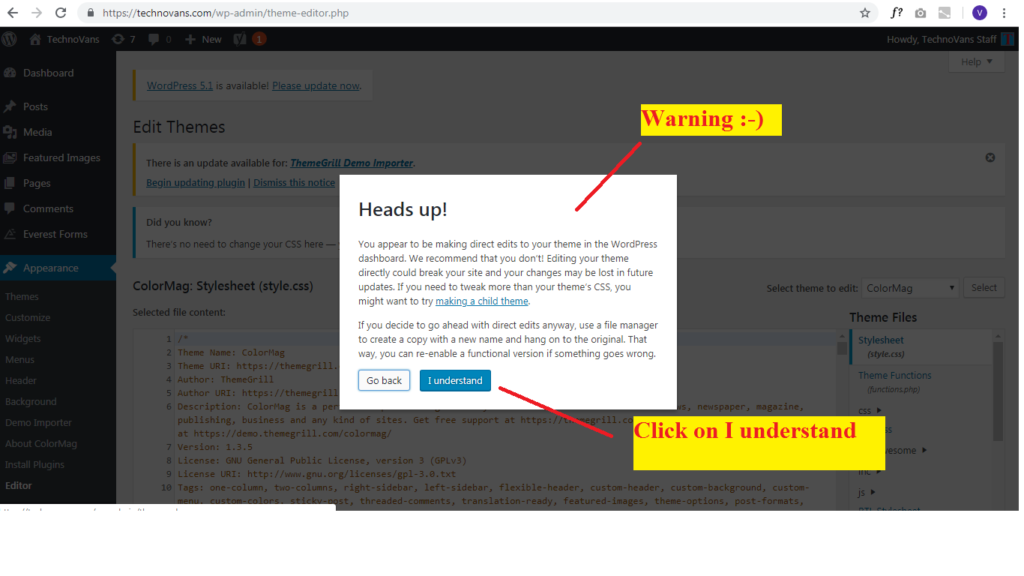
You appear to be making direct edits to your theme in the WordPress dashboard. We recommend that you don’t! Editing your theme directly could break your site and your changes may be lost in future updates. If you need to tweak more than your theme’s CSS, you might want to try making a child theme.
If you decide to go ahead with direct edits anyway, use a file manager to create a copy with a new name and hang on to the original. That way, you can re-enable a functional version if something goes wrong.
4. So if you want to go ahead then click on I Understand, otherwise Go back.
After clicking on I Understand, you will see like this:
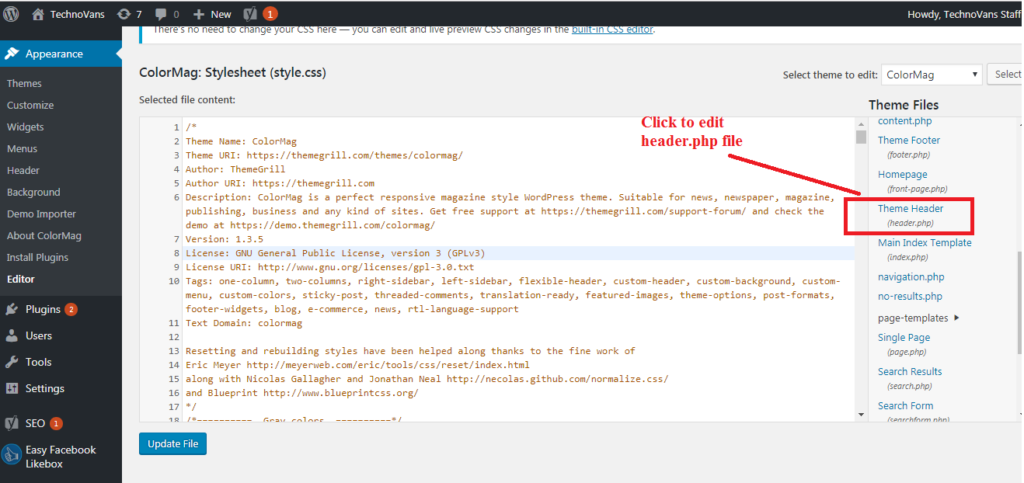
5. Click on Theme Header ( header.php )
6. Paste the GA Tracking code before
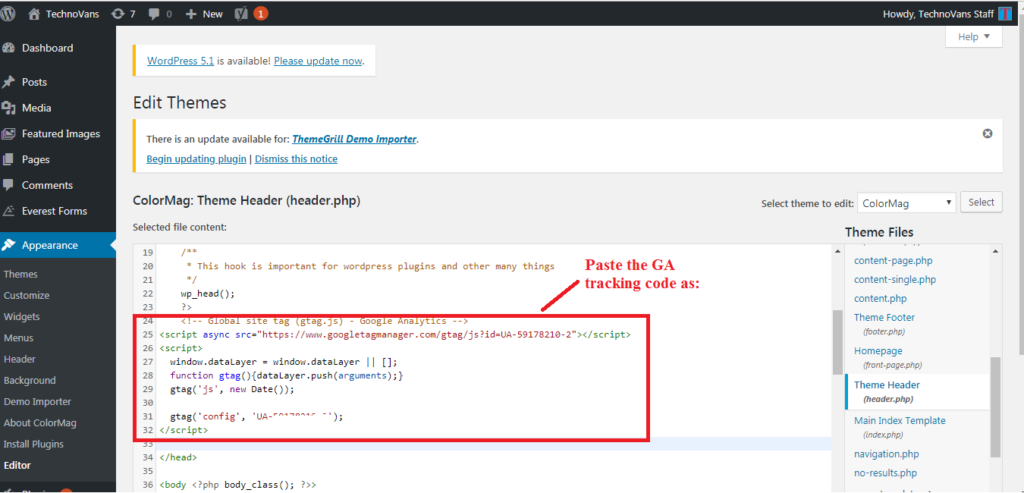
7. Click on Update File to save the changes.
Thats it! 🙂 You have successfully added the GA tracking code means you have successfully installed Google Analytics without using Plugin.
2. Use WordPress Plugin Insert Headers and Footers ( Recommended )
Now
We recommend
First, install and activate Insert Headers and Footers plugin.
Once you activate the Insert Headers and Footers plugin you can see Insert Headers and Footers menu under the Settings Menu on left side of WordPress dashboard.
Click on Insert Headers and Footers.
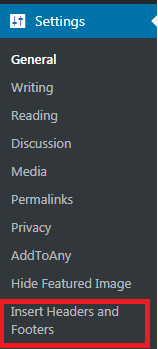
Insert Headers and Footers menu
Paste your GA tracking code in Scripts in header box and click on Save button at bottom.
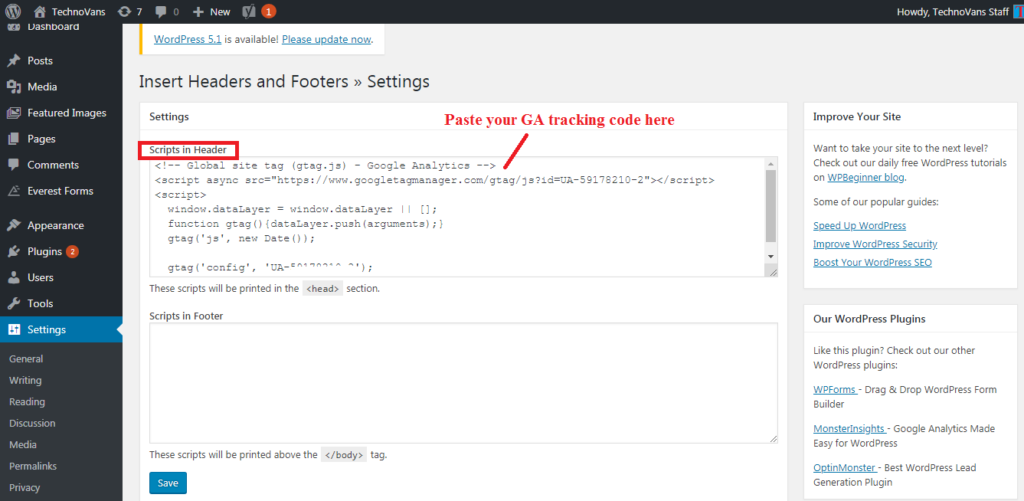
In this way, you can add the Google Analytics Tracking Code in WordPress. Congrats, you have installed Google Analytics successfully!!!
Let us know on what topic you want us to write next article, comment below this article or email us hellotechnovans@gmail.com


That’s for a good article! I wish I’d had it about a month ago I ended up using the Ad-Inserter plugin though, and it works great!
Glad to know that you find it useful.
As always your post are so helpful! You are so exact and that is wonderful since the how to’s sometimes are not. Great post
Thanks
This helped me very and decided to write an article about Google Analytics su WordPress on my own site, check it out.
Great!
Good article.
As this plugin is to be used just once, is it possible to delete this plugin after “Google analytics” is activated?
No, It needs to be there otherwise you need to follow the 1st method – Edit header.php file and put the Google Analytics code in between HEAD tag.